
Ventilation Upgrades for 3D Resin Printing
A How to Guide: Complete build list included
Published 9/1/2022 - Updated 1/16/2025
As makers, we share what we research, test, and use. If you decide to purchase anything we mention using our referral links, we may get a small commission at no cost to you. If you’d like to learn more, visit our affiliate policy.
To start, this ventilation setup should be used to complement good safety practices. Wear PPE ie. safety gear like a respirator, gloves, and eyewear when handling resin. Remember your health is important! This is what works for us. Do your research to see if it will be right for you. I try my best to keep this post updated so If I’ve missed anything, feel free to reach out to me at u/nycraylin on Reddit.
And now on with the show - Ventilation Upgrades for 3D Resin Printing.
As promised in my original Reddit post in r/resinprinting, a more in-depth post regarding my resin ventilation setup for 3d resin prototyping and production.
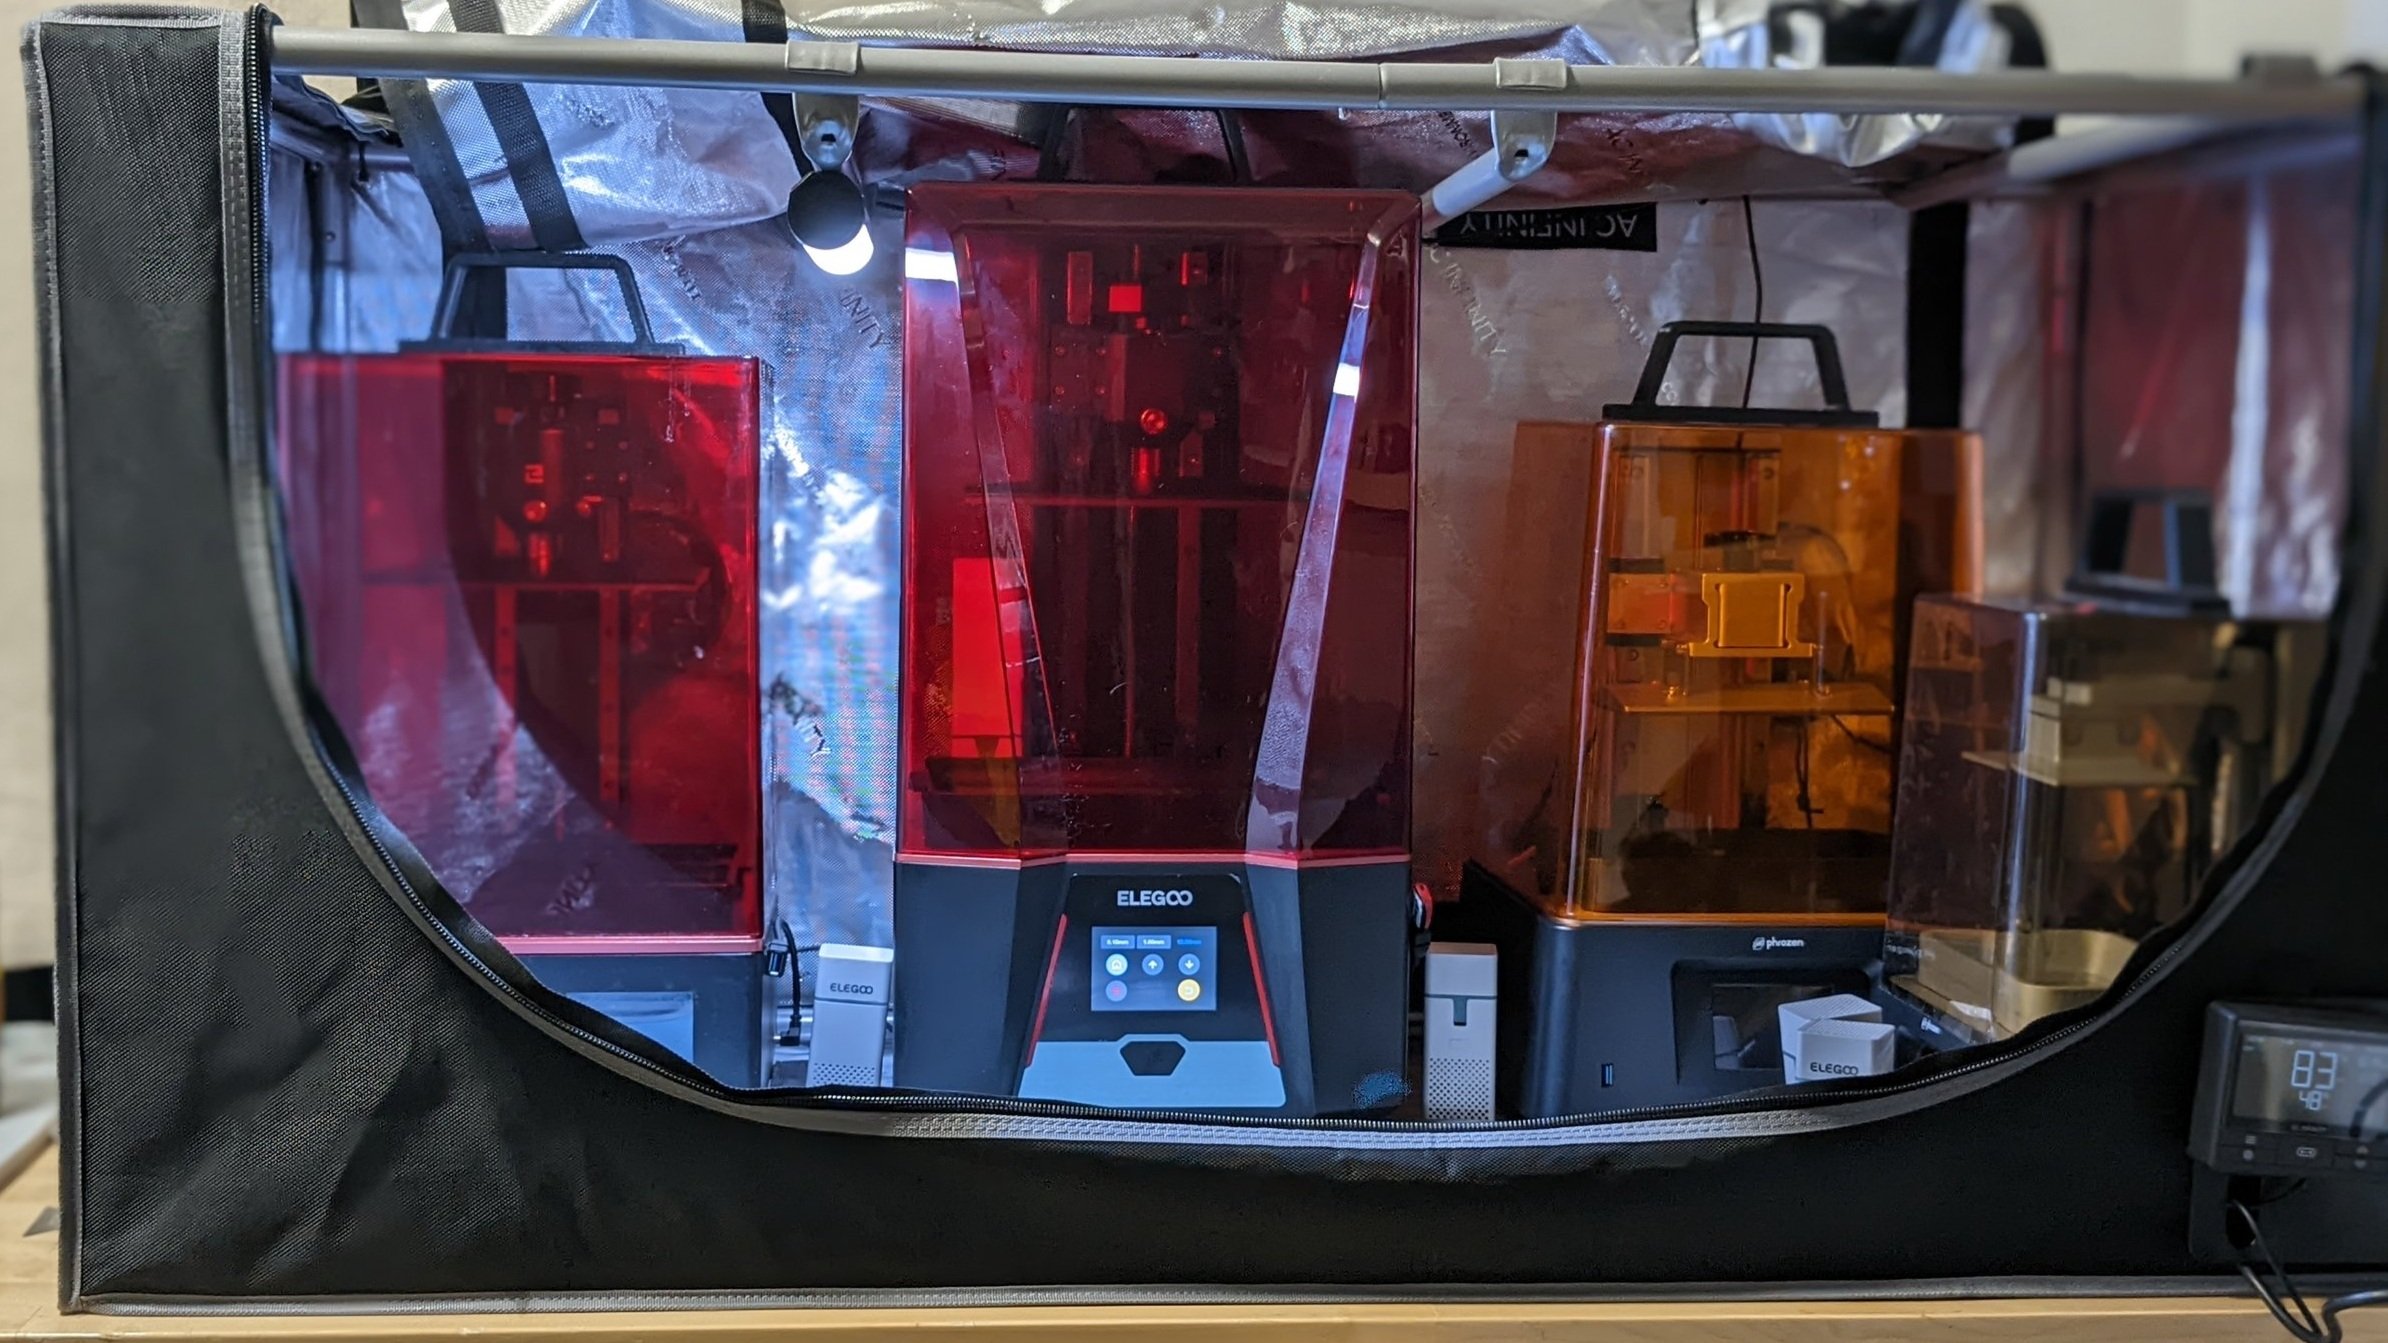
The above is my current setup, line up includes Elegoo Saturn, Saturn 2, Phrozen 8k Mini, and the Phrozen 4k Mini. I swap out printers, so the orientation changes depending on the work. Even though I have those mini carbon filters, I don’t use them anymore as I’ve upgraded my ventilation game.
So I did a bunch of research, what with googling the internets, and navigating Reddit posts and Facebook group posts for what felt like hours. I found two main camps, the “just have good ventilation” (with no in-depth writeups or how-to’s) crowd and the “I don’t smell it/I print in my bedroom, don’t even wear gloves, and it’s fine” crowd.
I figured - I can’t be the only one trying to solve this problem so I want to help others trying to do the same.
Here was my problem: I wanted to fit my printers and run them all at once instead of 2 max in my other setup which parked them in front of dual exhaust fans with a Merv filter that doubled as a paint booth (more on that in a later post!). And I didn’t want to use an air purifier as a replacement for adequate ventilation.
It’s a lot more practical to vent a small enclosure than it is to filter the air in a whole room
Replacement filters are expensive - I run a BlueAir 121 for allergies. Filters are like $60+
Basically, I found that some people were using grow tents for their enclosures. You can find a bunch of them on youtube. But most grow tents are huge and are usually used upright (even in the videos using them for 3d printing) because plants grow upwards. Which makes total sense right? We could and probably should use products the way they are designed to be used.

Or hear me out… If you turn the grow tent sideways 💡🧠🤯 then You can fit more printers! Also if you are running 1 - 2 printers, there’s enough room to put the wash and cure bundle* too. It can hold all your printing gear and doubles as an enclosed vented workspace for post-processing your prints! (see notes* for IPA safety)
Let your uncured prints dry off, after washing off the excess resin so they get a chance to off-gas and not stink up the room. I use a Red lunch tray for uncured prints. Red for Stop/Danger. This an easy reminder for me to wear my gloves and a respirator before handling. Read more about PPE in Resin Saftey 101
You’ll also be able to let them dry in there after water curing so any post-curing smells get removed before you handle them. If you’ve ever held a cured print, you know it still has a smell for a while. I use a Green lunch tray for cured prints. Green for Go/Good. So I know they are safe to touch. I’ll write more about my resin printing workflow in a future post if anyone is interested in that.
And what about airflow? Will it work as well if it’s not upright? When the tent is sideways it will still pull air/resin off-gassing very well. Check the video below to see it in action!
As you can see it pulls even from the outside of the grow tent! Testing the air pull with lit incense, which was promptly used to honor the ancestors off-camera. Mind the music, I think Dr Strange 2 End credits was scrolling by at the time.

Knocked some things over trying to build it on the table.
This is the unit I used (pictured here) AC Infinity CLOUD LAB 422 Advance Grow Tent, 24”x24”x48” I chose it because I have a 24’ x 96’ workbench (this one).
You’re going to want to build the grow tent in a space where you can spread out. Don't do what I did and build the tent upright to where you plan to put it. I was like halfway done when I realized this was a terrible idea in practice. But my experience is your lesson!
Definitely build it on the floor, and then bring the assembled tent to the tabletop afterward. Because it’s awkward to put the mylar cover (see picture, again 😮💨) already without worrying about knocking over something on your table as I did. 😭
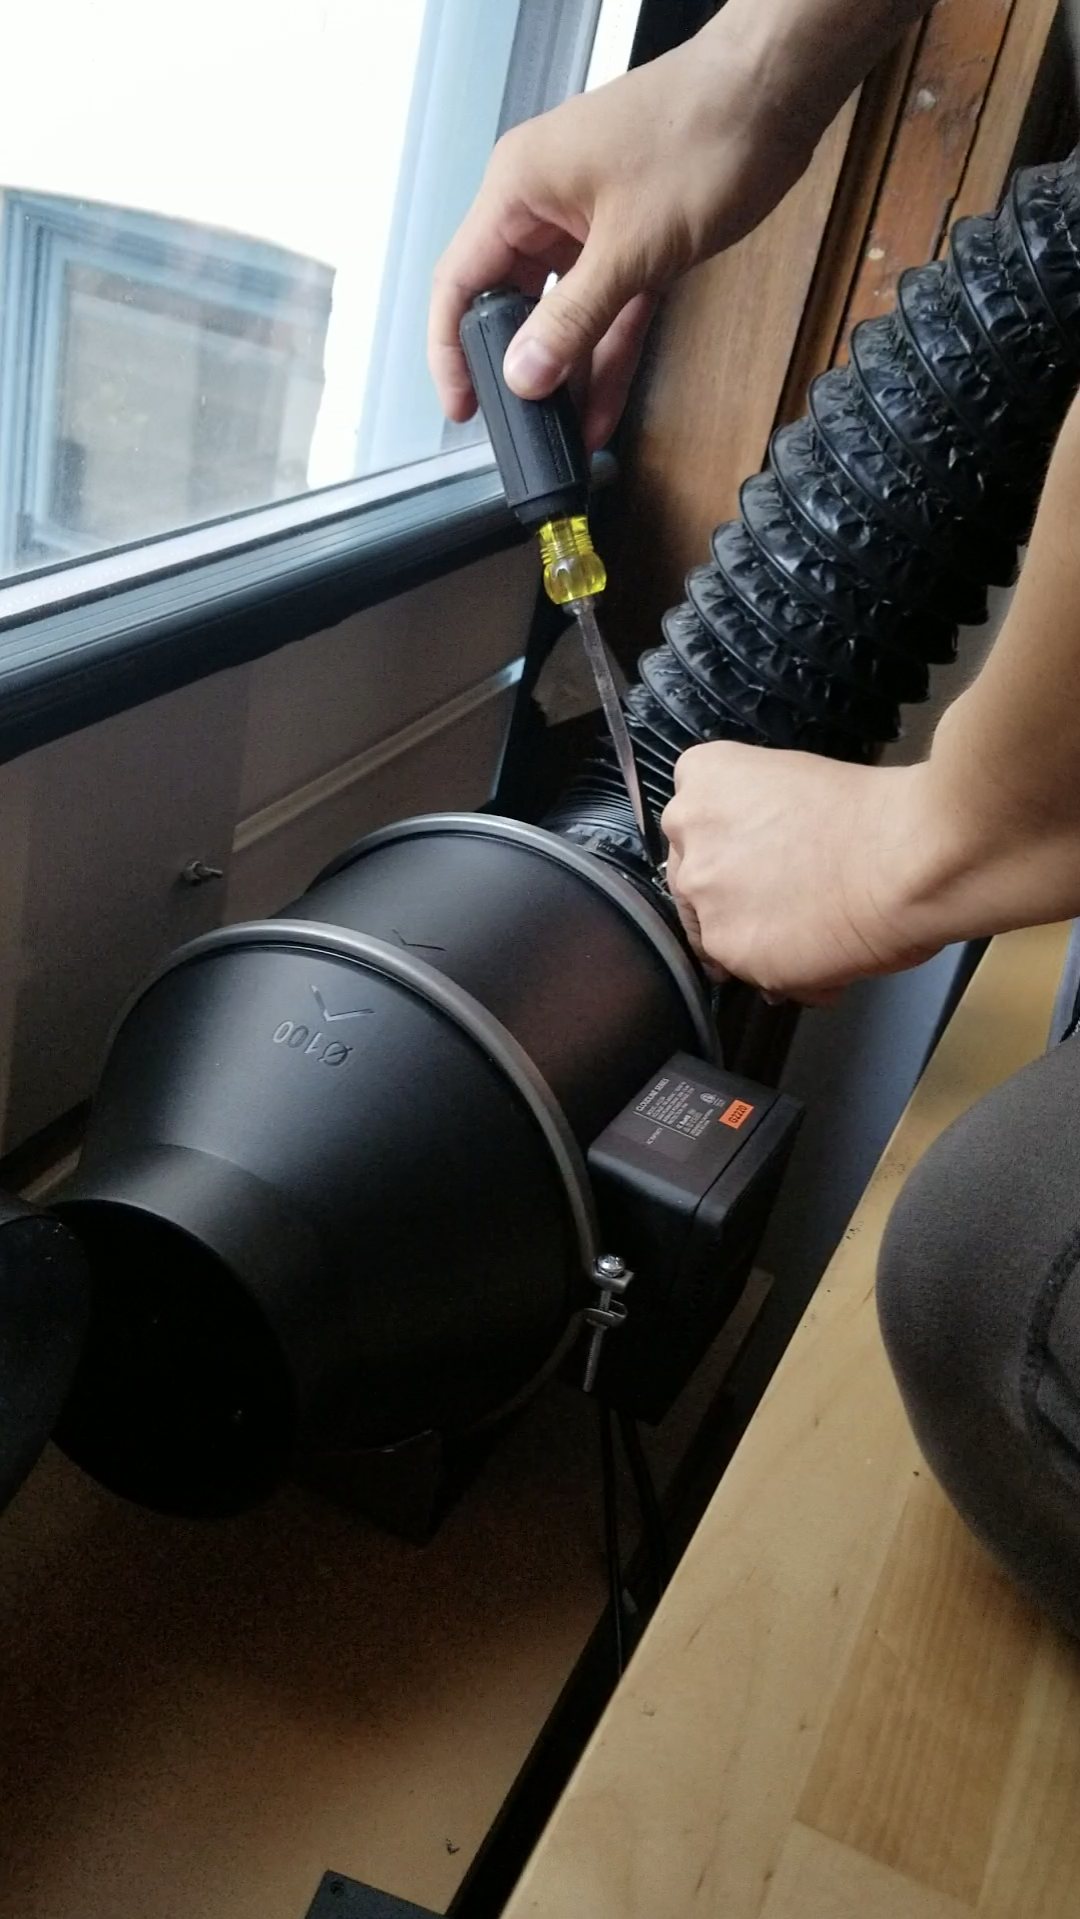
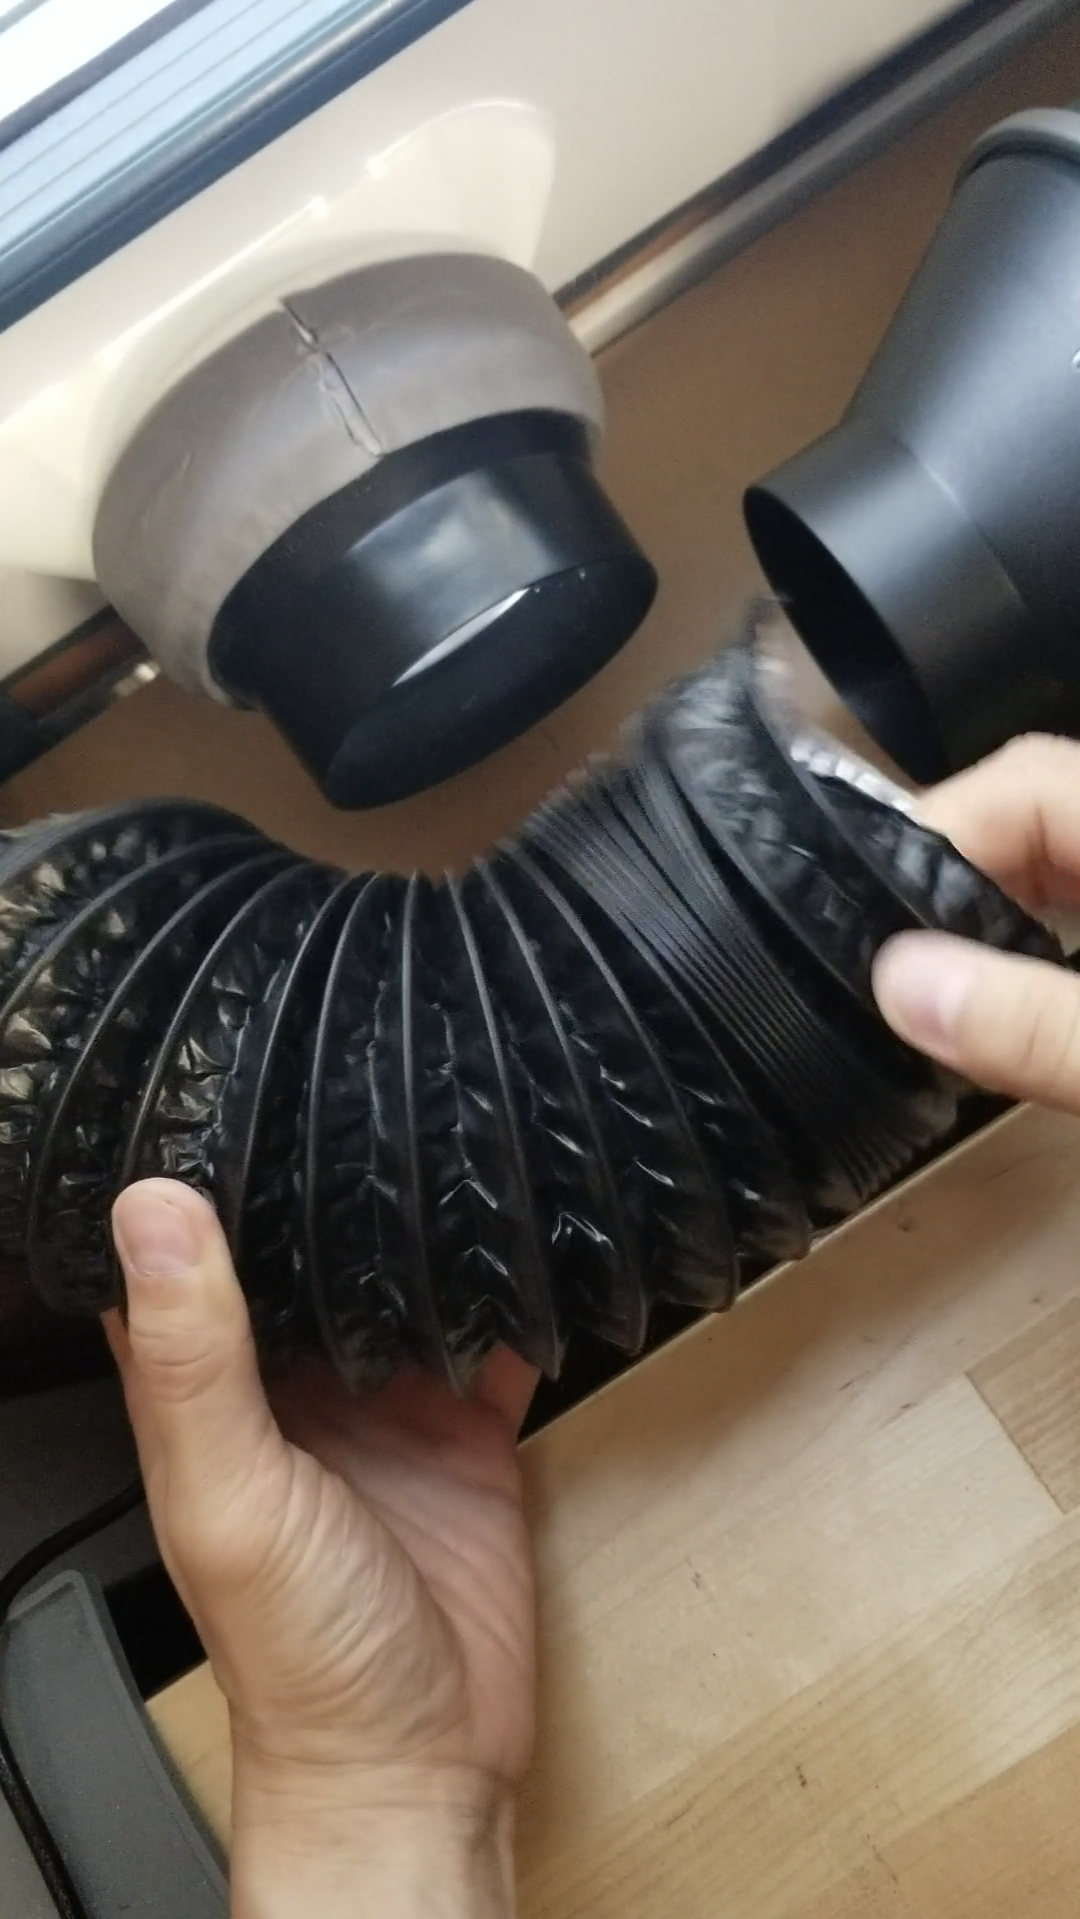
So to get this going - all you do is set up your window with an AC adapter, like for a windowless ac unit - (I used this adapter), and then connect the 4 to 5-inch duct expander to it. It doesn't fit perfectly, because the window adapter has "threads" but you can bend the duct expander a little and it'll fit. Be sure to tape over the edges where the AC Adapter head meets the duct expander with the foam tape that comes with the AC adapter to get a well fitted seal.
Then you can connect one end of the aluminum ducting to the duct expander.
Take the other end of the ducting and connect it to the inline fan. Fasten that end with the 4-inch metal fasteners
Lastly cut some more ducting to fit the other end of your fan to connect to your tent.
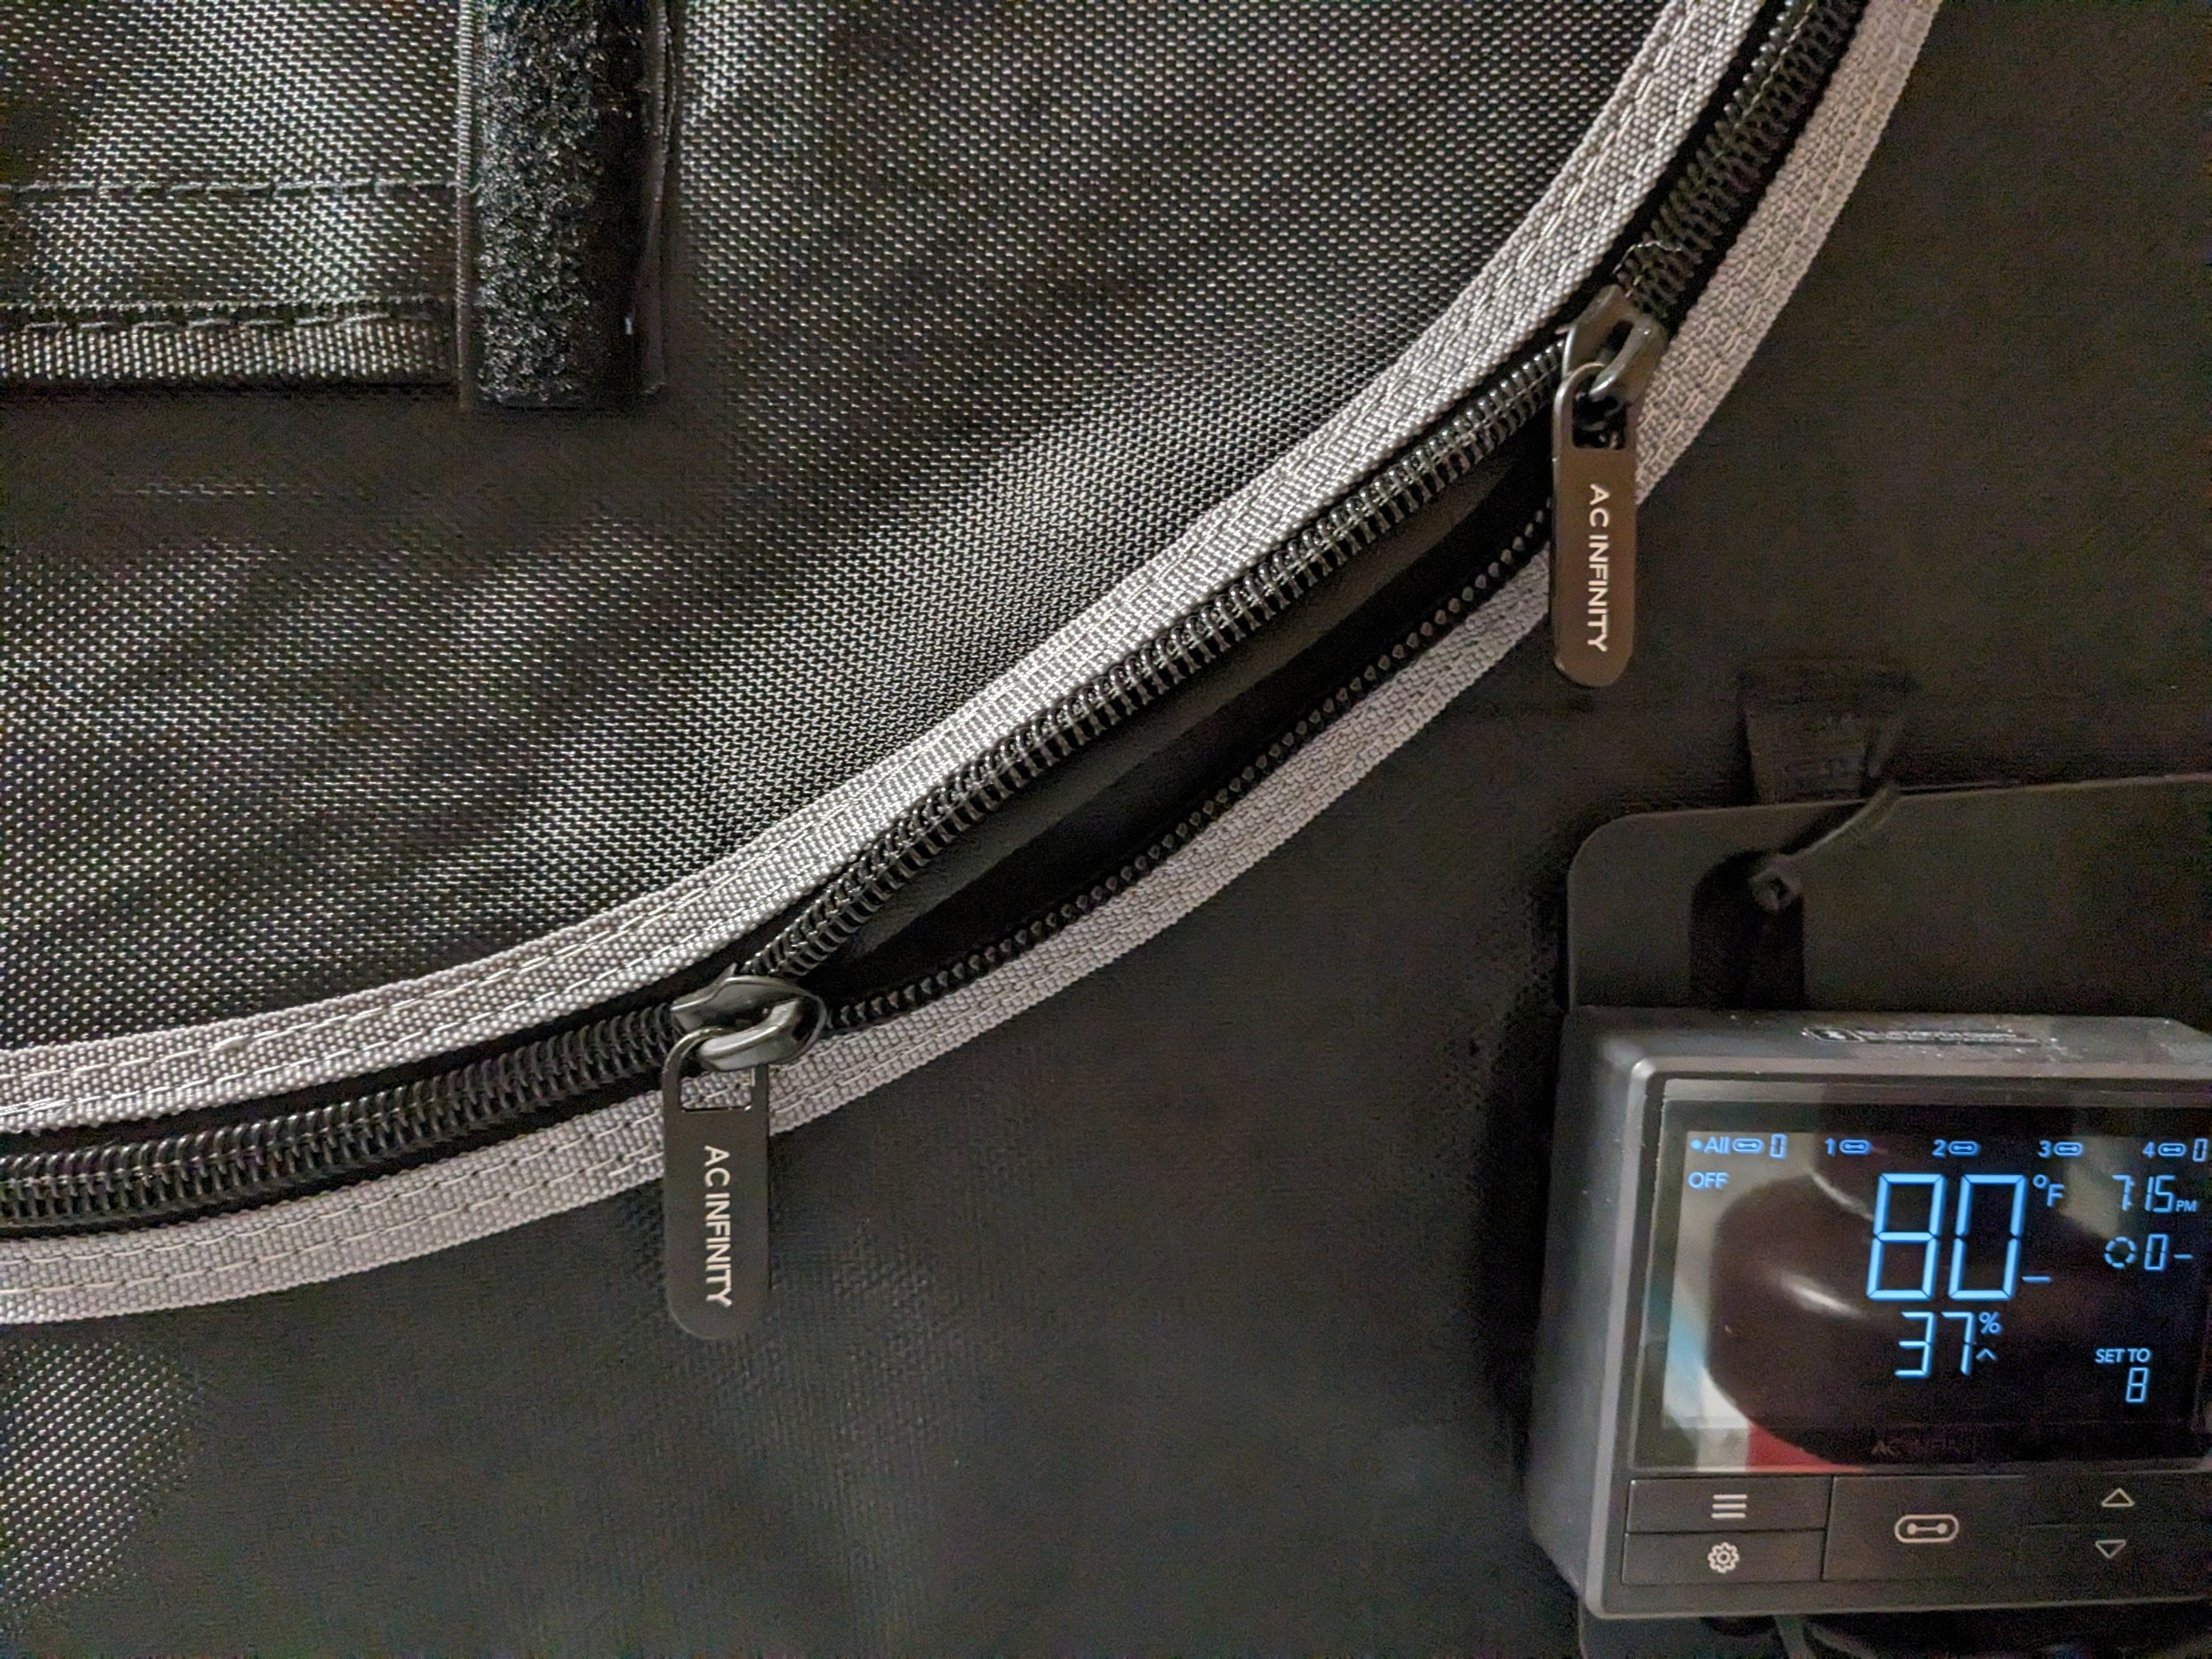
There are many brands of inline fans, I ended up going with this the AC Infinity CLOUDLINE T4 inline fan. There are a few different versions, a regular degular one with just a fan speed controller (pictured here) and one with the temperature/humidity readout, programmable and can be used with a blue tooth app (pictured below)

AC Infinity CLOUDLINE T4 inline fan with speed controller.

This is the unit I ended up using because I like being able to see the temperature and humidity conditions inside the tent because that kind of data is important to successful 3d printing and resin in general. Also, there is an app that you can use via Bluetooth to program the unit - haven’t had to use it yet, but for only ~$13 USD more than the regular version - I like the options!
The Assembly Process
Make sure you note which end of the fan you're connecting it to, it's labeled with an arrow to indicate the airflow. Fasten the ends with the 4-inch metal fasteners included in the kit and connect the remaining end of the ducting to your grow tent hole. I bought the AC Infinity Flexible 4-Inch Aluminum Ducting 25 ft.
But you could get the 8 ft one if you don't need so much. I like having more just in case I need to relocate the fan, but realistically I could have used the 8 ft one as my window is very close to the grow tent and your situation might be different.
As for the grow tent connection point, You need to extend the tubing whilst using a twisting motion to get it through the hole. I suggest pushing the ducting further into the grow tent so it doesn't fall out and then tightening the grow tent drawstring around the ducting to secure it in place. (can also attach to carbon filter - See Additional Build Notes below)
And I mean, that’s pretty much it. You’re done at that point! Place your silicone mats or lunch trays down in case of spills. Put your printers in there. Run the power cable to your outlet. And if you’re into r/cableporn do some cable management with zip ties along the edges of the enclosure to keep everything nice and neat.
When you start your prints, zip up your tent, not fully though - allow for some air pull. I like to leave the opposite edge open, my fan exhaust is located to the left of my enclosure so I leave the right side open for air draw. Turn the fan on while you print, and turn it off after you’re done post-processing.
BAM! Congratulations - You’re safer already!
For more info - feel free to consult the Additional build notes listed below.
Workflow Tip: I leave my prints to dry in the enclosure to off-gas with the fan on after IPA washing before I trim and water cure. Read more about this in my Resin Safety 101.
Additional Build Notes:
Measure your length of ducting BEFORE you cut it by dry fitting and testing out the bends to see if you have some extra slack
Put your 4-inch hose clamps on the tubing BEFORE you connect to the fan. So you don’t have to take it off when you finally get the tubing on the fan end (thrice) Again, my window was pretty close to grow tent so I didn't have to use too much ducting, but your space might be different.
Also, I know there are more affordable fans out there but their power draw is apparently a lot more than the Ac Infinity one. I was watching some reviewers on youtube and apparently, some can pull 60W/h while the Ac infinity one only used 20W/h average (28W max) for the same size fan. Cloudline fans are super quiet even at max speed because of their brushless EC motors. Again, Not sponsored - Just found something I liked and wanted to share it with others.
It costs more upfront. but for quality-of-life issues such as operating cost savings over time and noise levels - I think it’s worth it.
Enclosure Lighting Tips:
I had some of you reach out to ask me what light I use for this setup - so I’ll add it to the build list. Here is a quick video on how it works.
When I’m working inside the tent, I use the ULANZI VL110 RGB Light Wand for the additional light source. It’s dimmable, and I keep it at 10% - 25%. I use it for photography and videography and It works flawlessly as an upgrade for the enclosure. The wand has embedded magnets so it easily detaches when I don’t need it. It charges via USB 3.0 and can run plugged in to stay off battery power. Easily one of my favorite quality-of-life upgrades for this enclosure. because this one light serves multiple purposes. If you’re taking photos/videos too, this might be right for you.
If you don’t do any of that stuff and find yourself just needing some light inside the enclosure, just install a regular degular Dimmable White LED Strip along the poles. I’ve used the same lights for my Prusa mk3s enclosure. It comes with tape on the back so the installation is pretty simple. You can also use a zip tie to reinforce it at the ends and put the controller where you can easily access it with some VHB tape (the best double-sided tape IMO) The only gripe is that it’s kind of a pain if you’ve already set up your space. You’ll need to move your printers to get around to the sides to install them. But it’s like ~$15 USD and you get 40ft of it so…¯\_(ツ)_/¯ You get light and save money for more resin. Win/Win
If the temperature gets too cold:
There are now more QOL upgrades printing companies offer such as heated vat chambers. But one tried and true method is the good old fermentation belt around your vat held down by some printed clips. Depending on your model printer - there are different clips designed for them. Search around the usual spots (makerworld, thingiverse, thangs, or printables) and most of the time someone else in the printing community with the same problem has already solved it and shared what they used.
And if you are more inclined to build a more bespoke solution - Thanks to Reddit User r/ccatlett1984 for designing a setup you can try with all the parts listed on their github. https://github.com/ccatlett1984/mSLA_Vat_Heater.
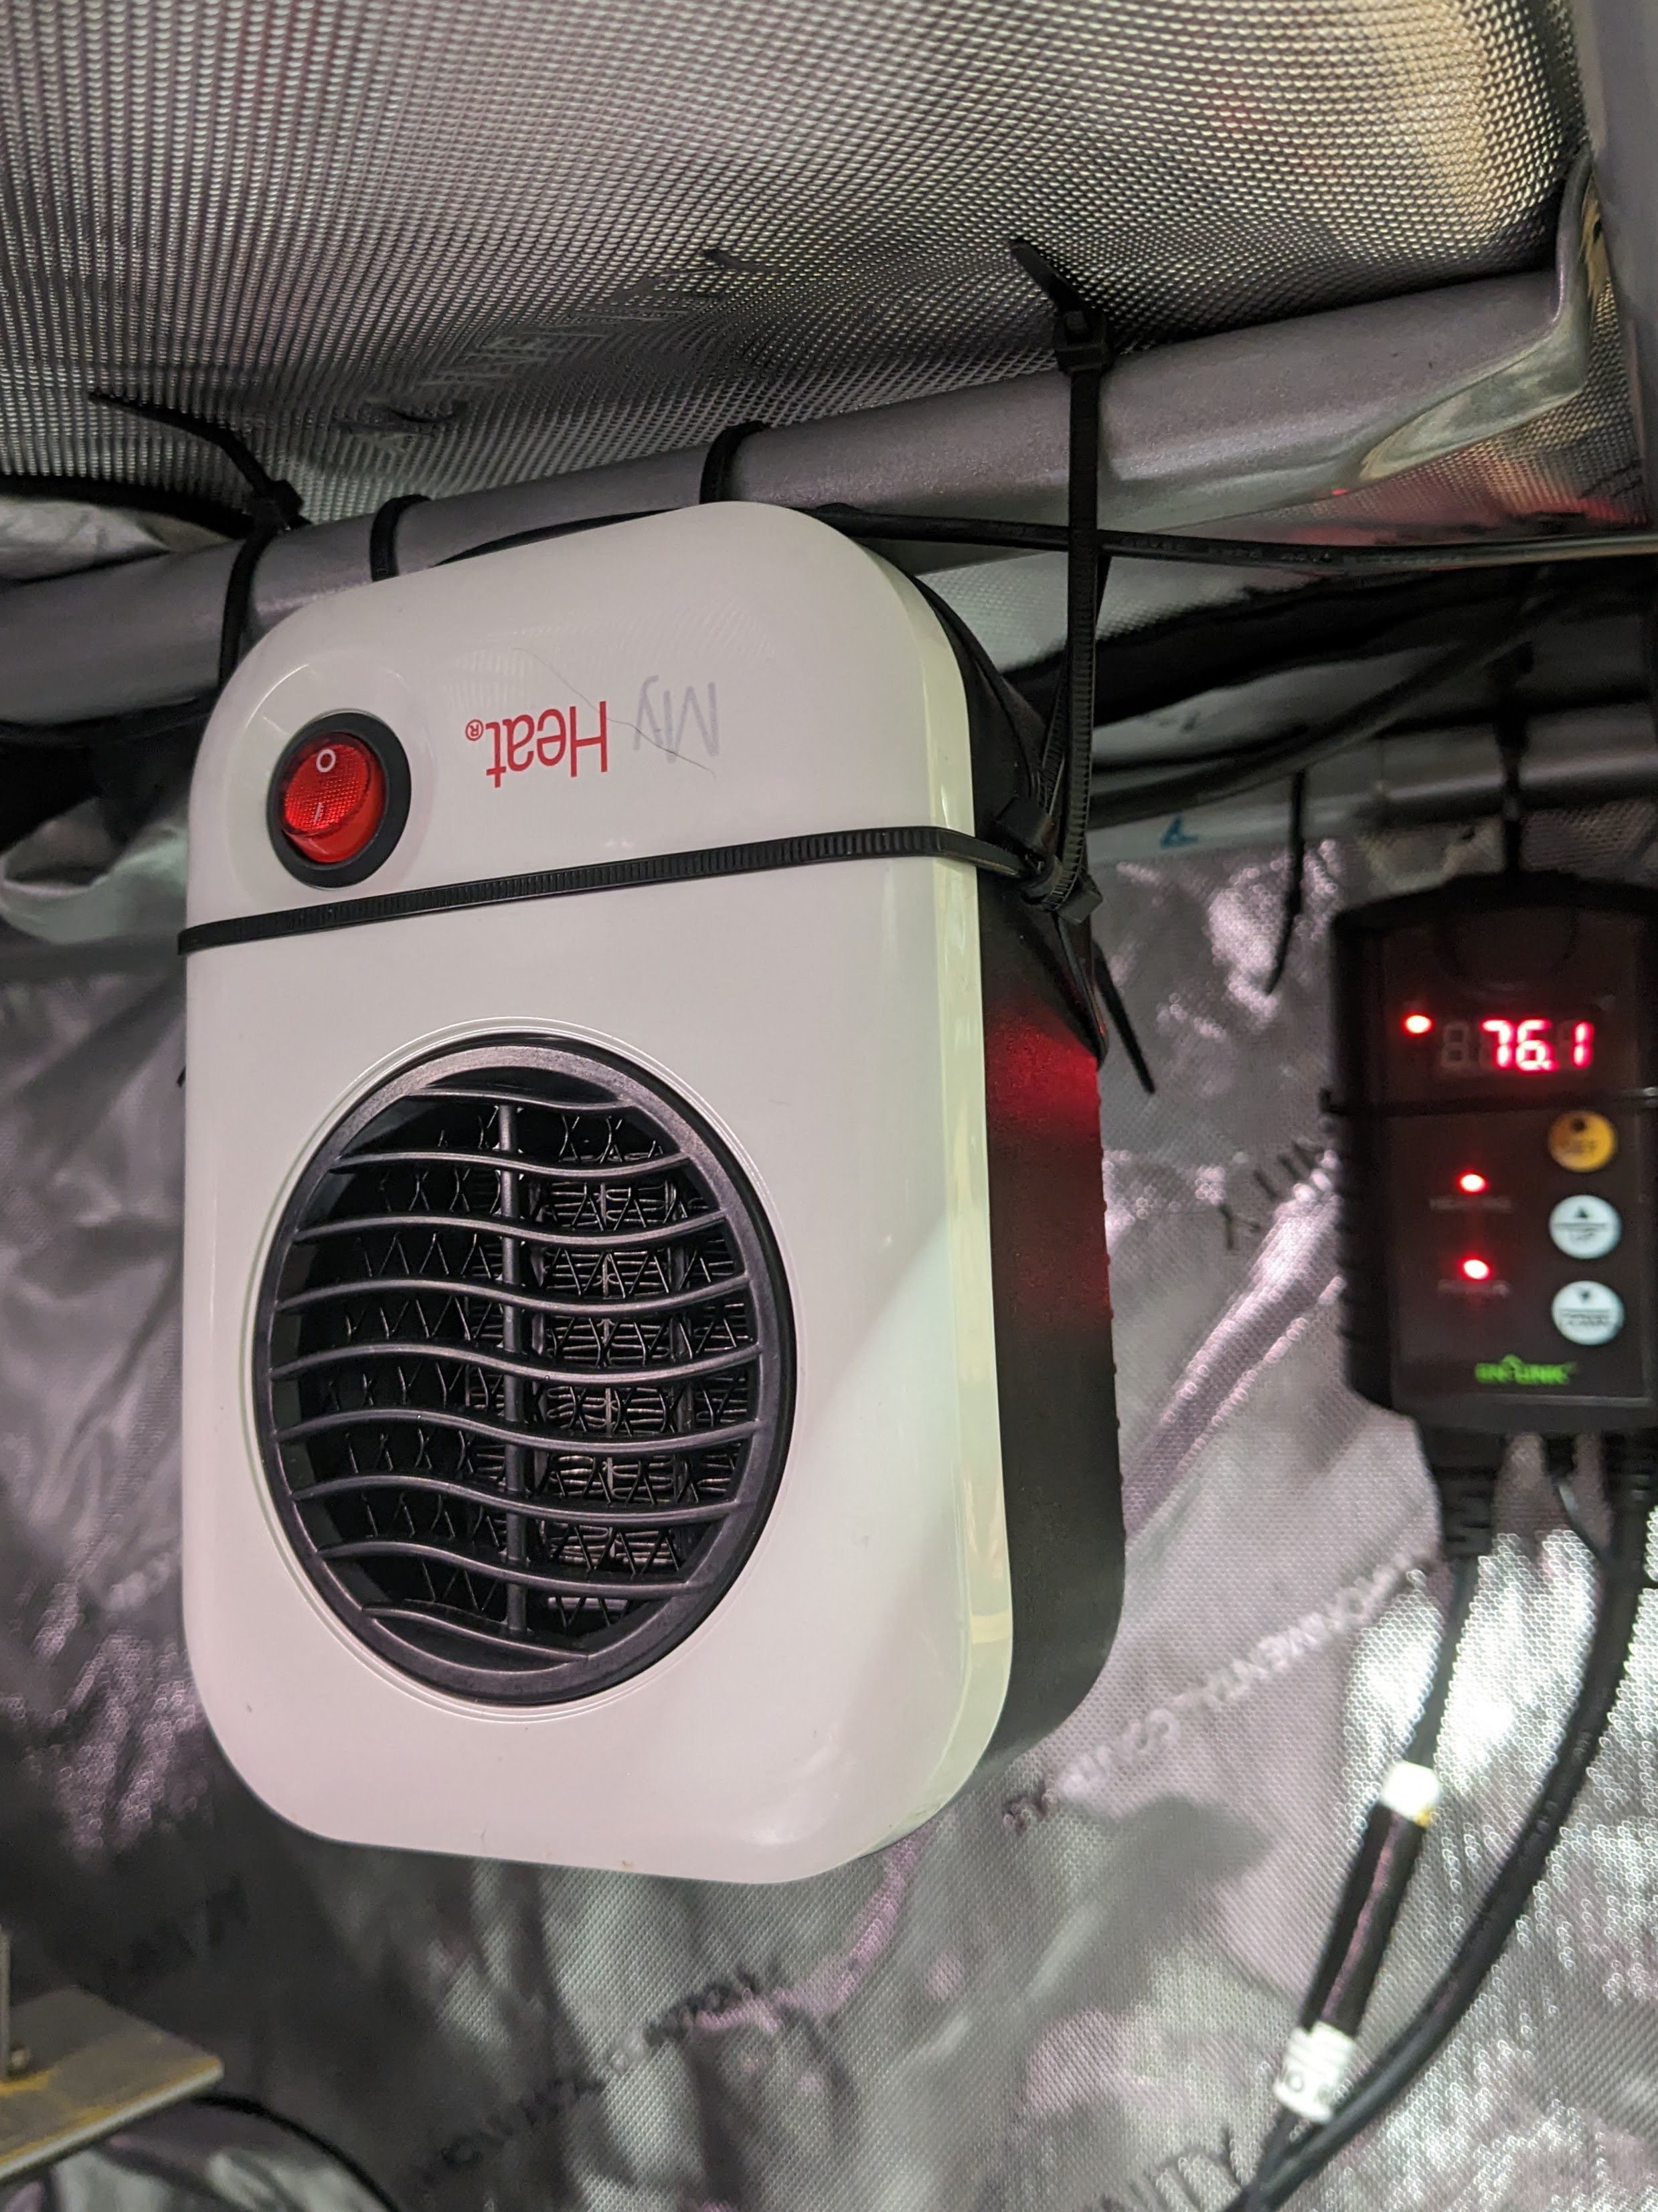
In the past: I used a small personal space heater* when running multiple printers.
I bought it used for about $~17. Mine is elegantly installed using zip ties and keeps a constant 85° F (29°C) in the enclosure. I highly recommend using the above fermentation belt method if you are running 1 or 2 printers.
When using a heater, I follow these precautions.
Avoid leaving the heater unattended.
Do not block the intake.
Keep materials from being in the heat path.
Remove any flammables including IPA from the enclosure.
As another safeguard, I use a thermostat controller. It turns off the heater when it hits the designated temperature - set to turn off if it hits 86°F. The fan speed is also useful for regulating your temperatures, depending on the ambient temperature.
Currently (as of 1/30/2025) I haven’t had many cold related issues printing because I’ve moved the printers to a different space.
Additional Tip for Cold Resin:
Resin has temperatures ranges it stays optimal in. Adding cold resin during a print can result in print lines because of the sudden change in temperature and surface tension of the resin.
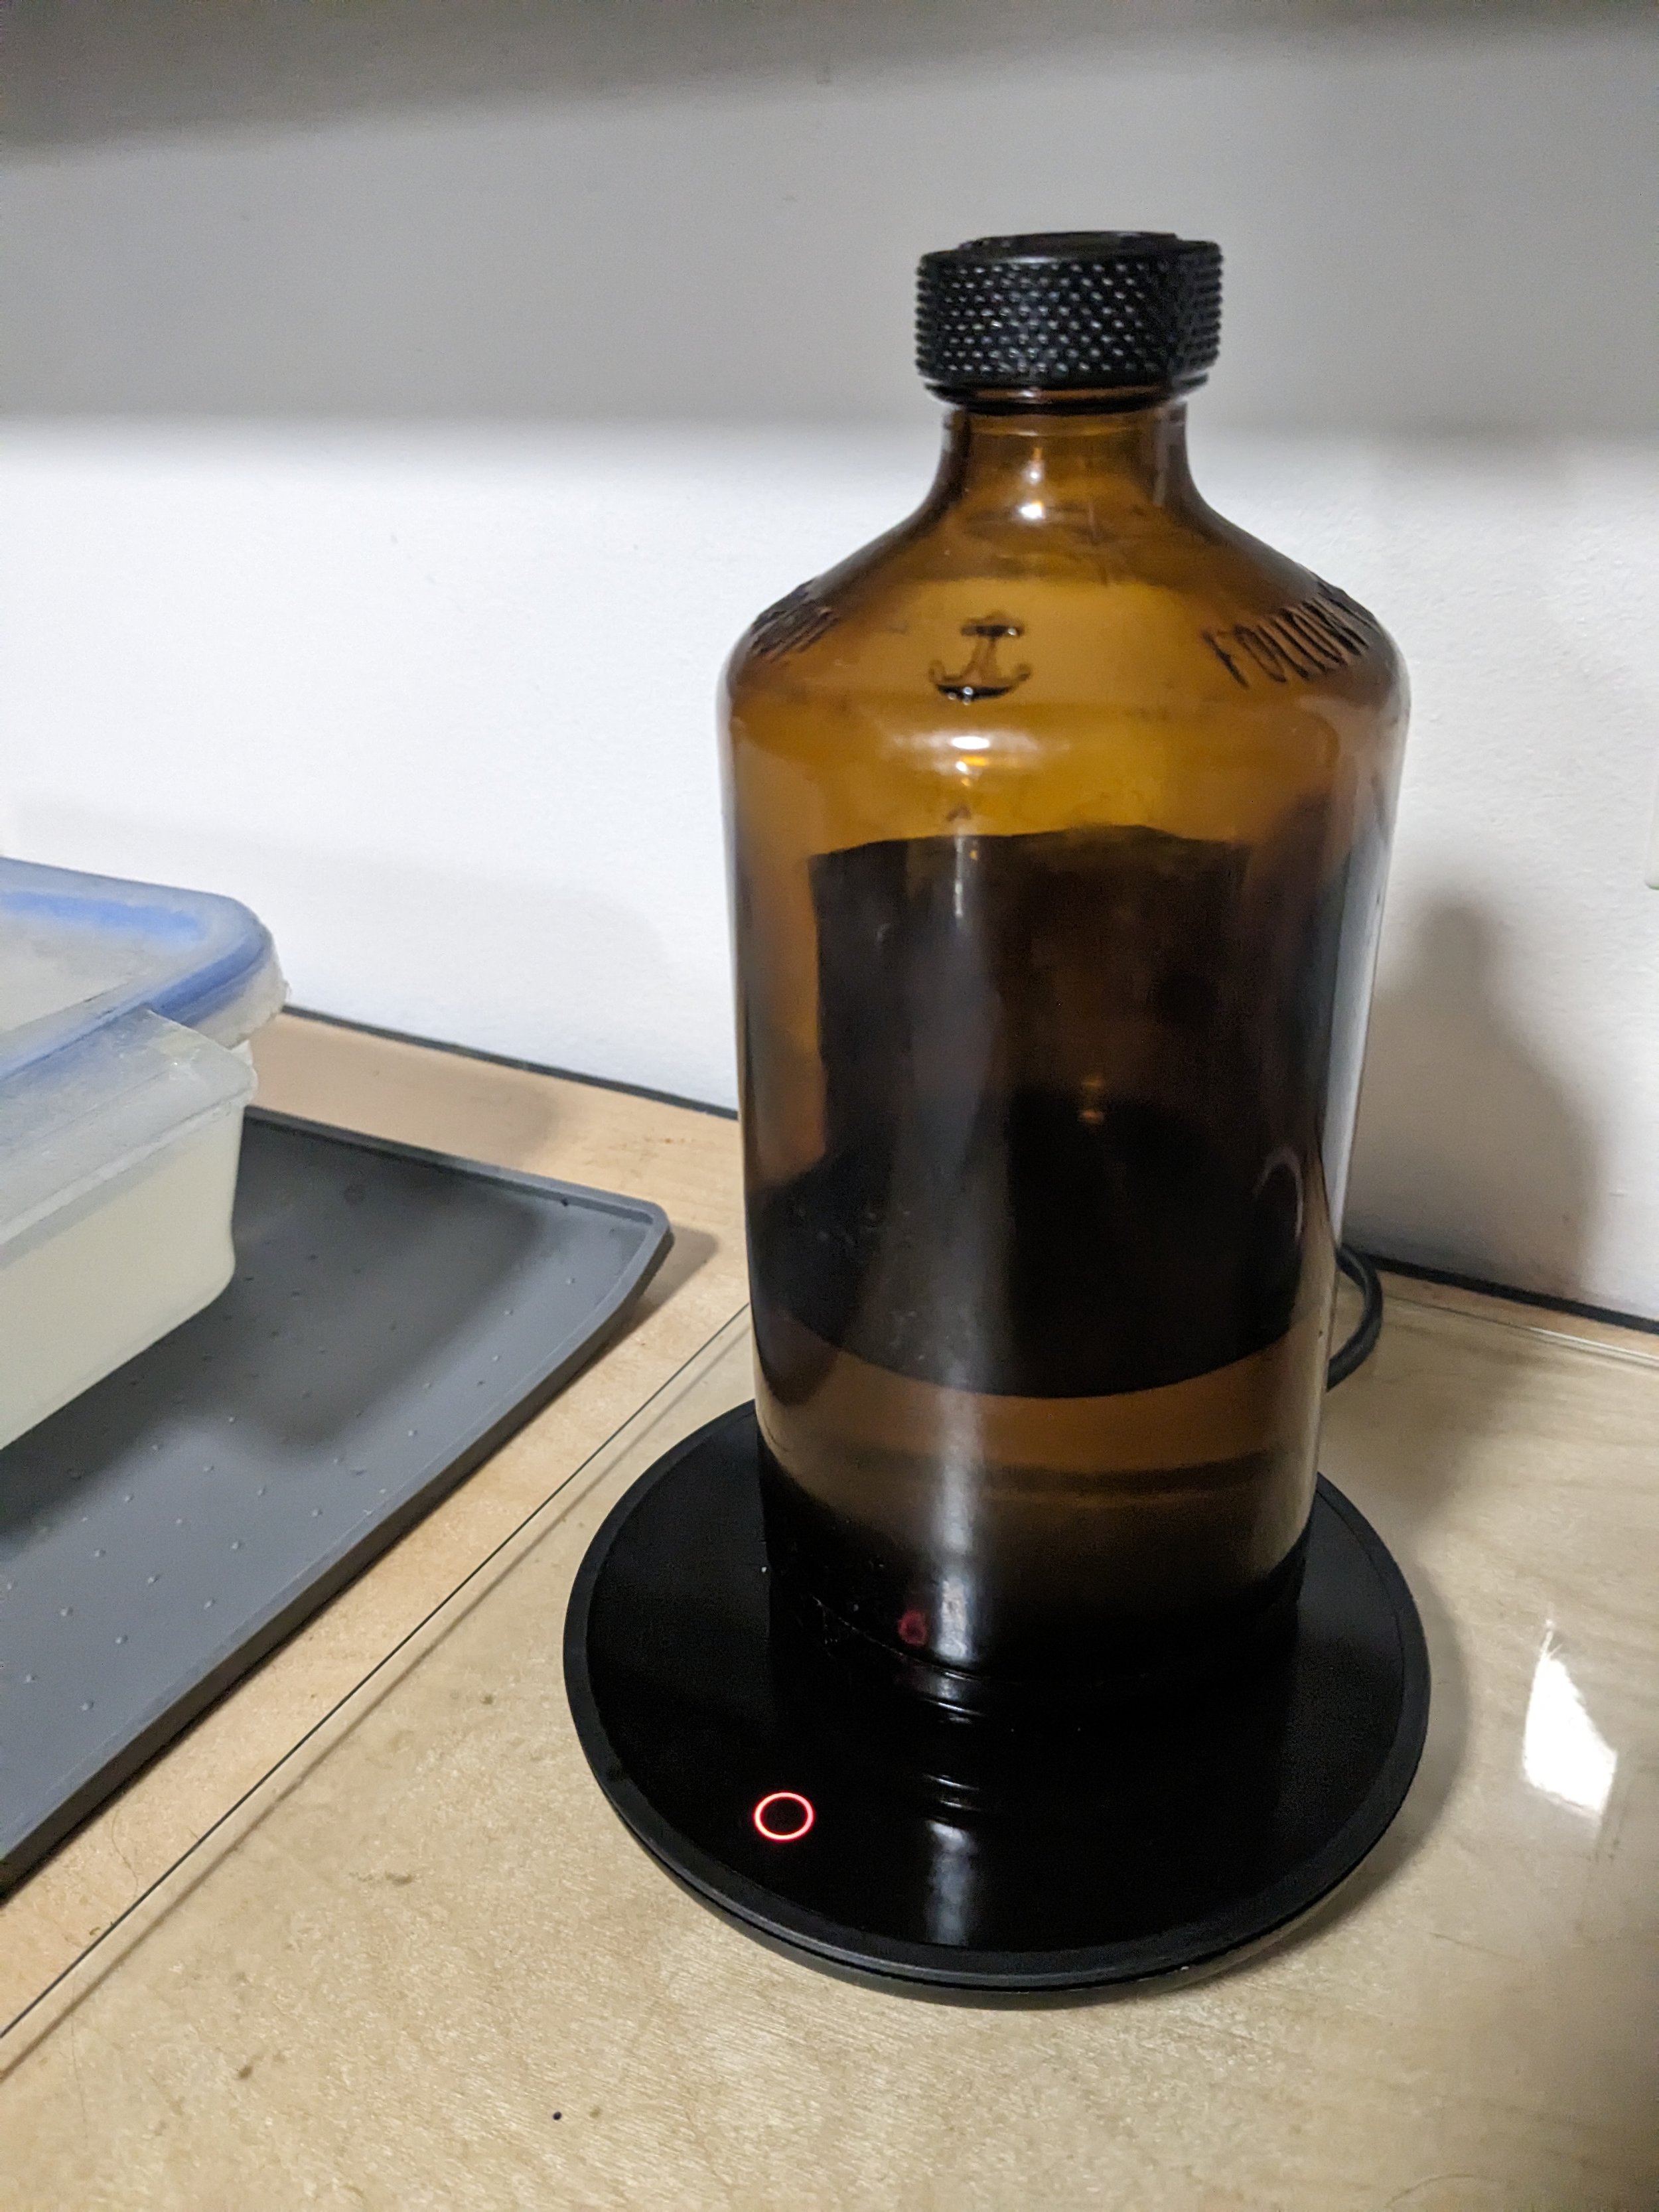
I use amber glass bottles (save them from cold brew coffee concentrate or kombucha) to store resins in. You can see exactly how much you got left and they protect from UV light. If it’s cold where you’re at, use this cup warmer to prewarm your resin before pouring it into your vats. The cup warmer is really easy to use. I tap the button area (there’s really no button it’s a smooth glass top) with my knuckle when handling resin.
Blue light keeps warm at 104° - 122°F and Red light - 122° - 140°F. I usually tap red, leave for a few minutes and then tap for blue to keep warm while I’m prepping the files for printing. It only takes about 5 -10 minutes depending on your ambient temperature to warm up your resin. I don’t really let it get hot, just warm. Do Not Touch the surface of the warmer. It stays hot for a while. If you’re running a fermentation belt around your vat, you can skip this, it essentially will do this step for you.
My old method was to use warm water in a plastic container to warm my resin but I didn’t like having to wipe wet bottles and potential spills. I think this method is a lot easier - keeps my work area dry.
Additional Venting Precautions:
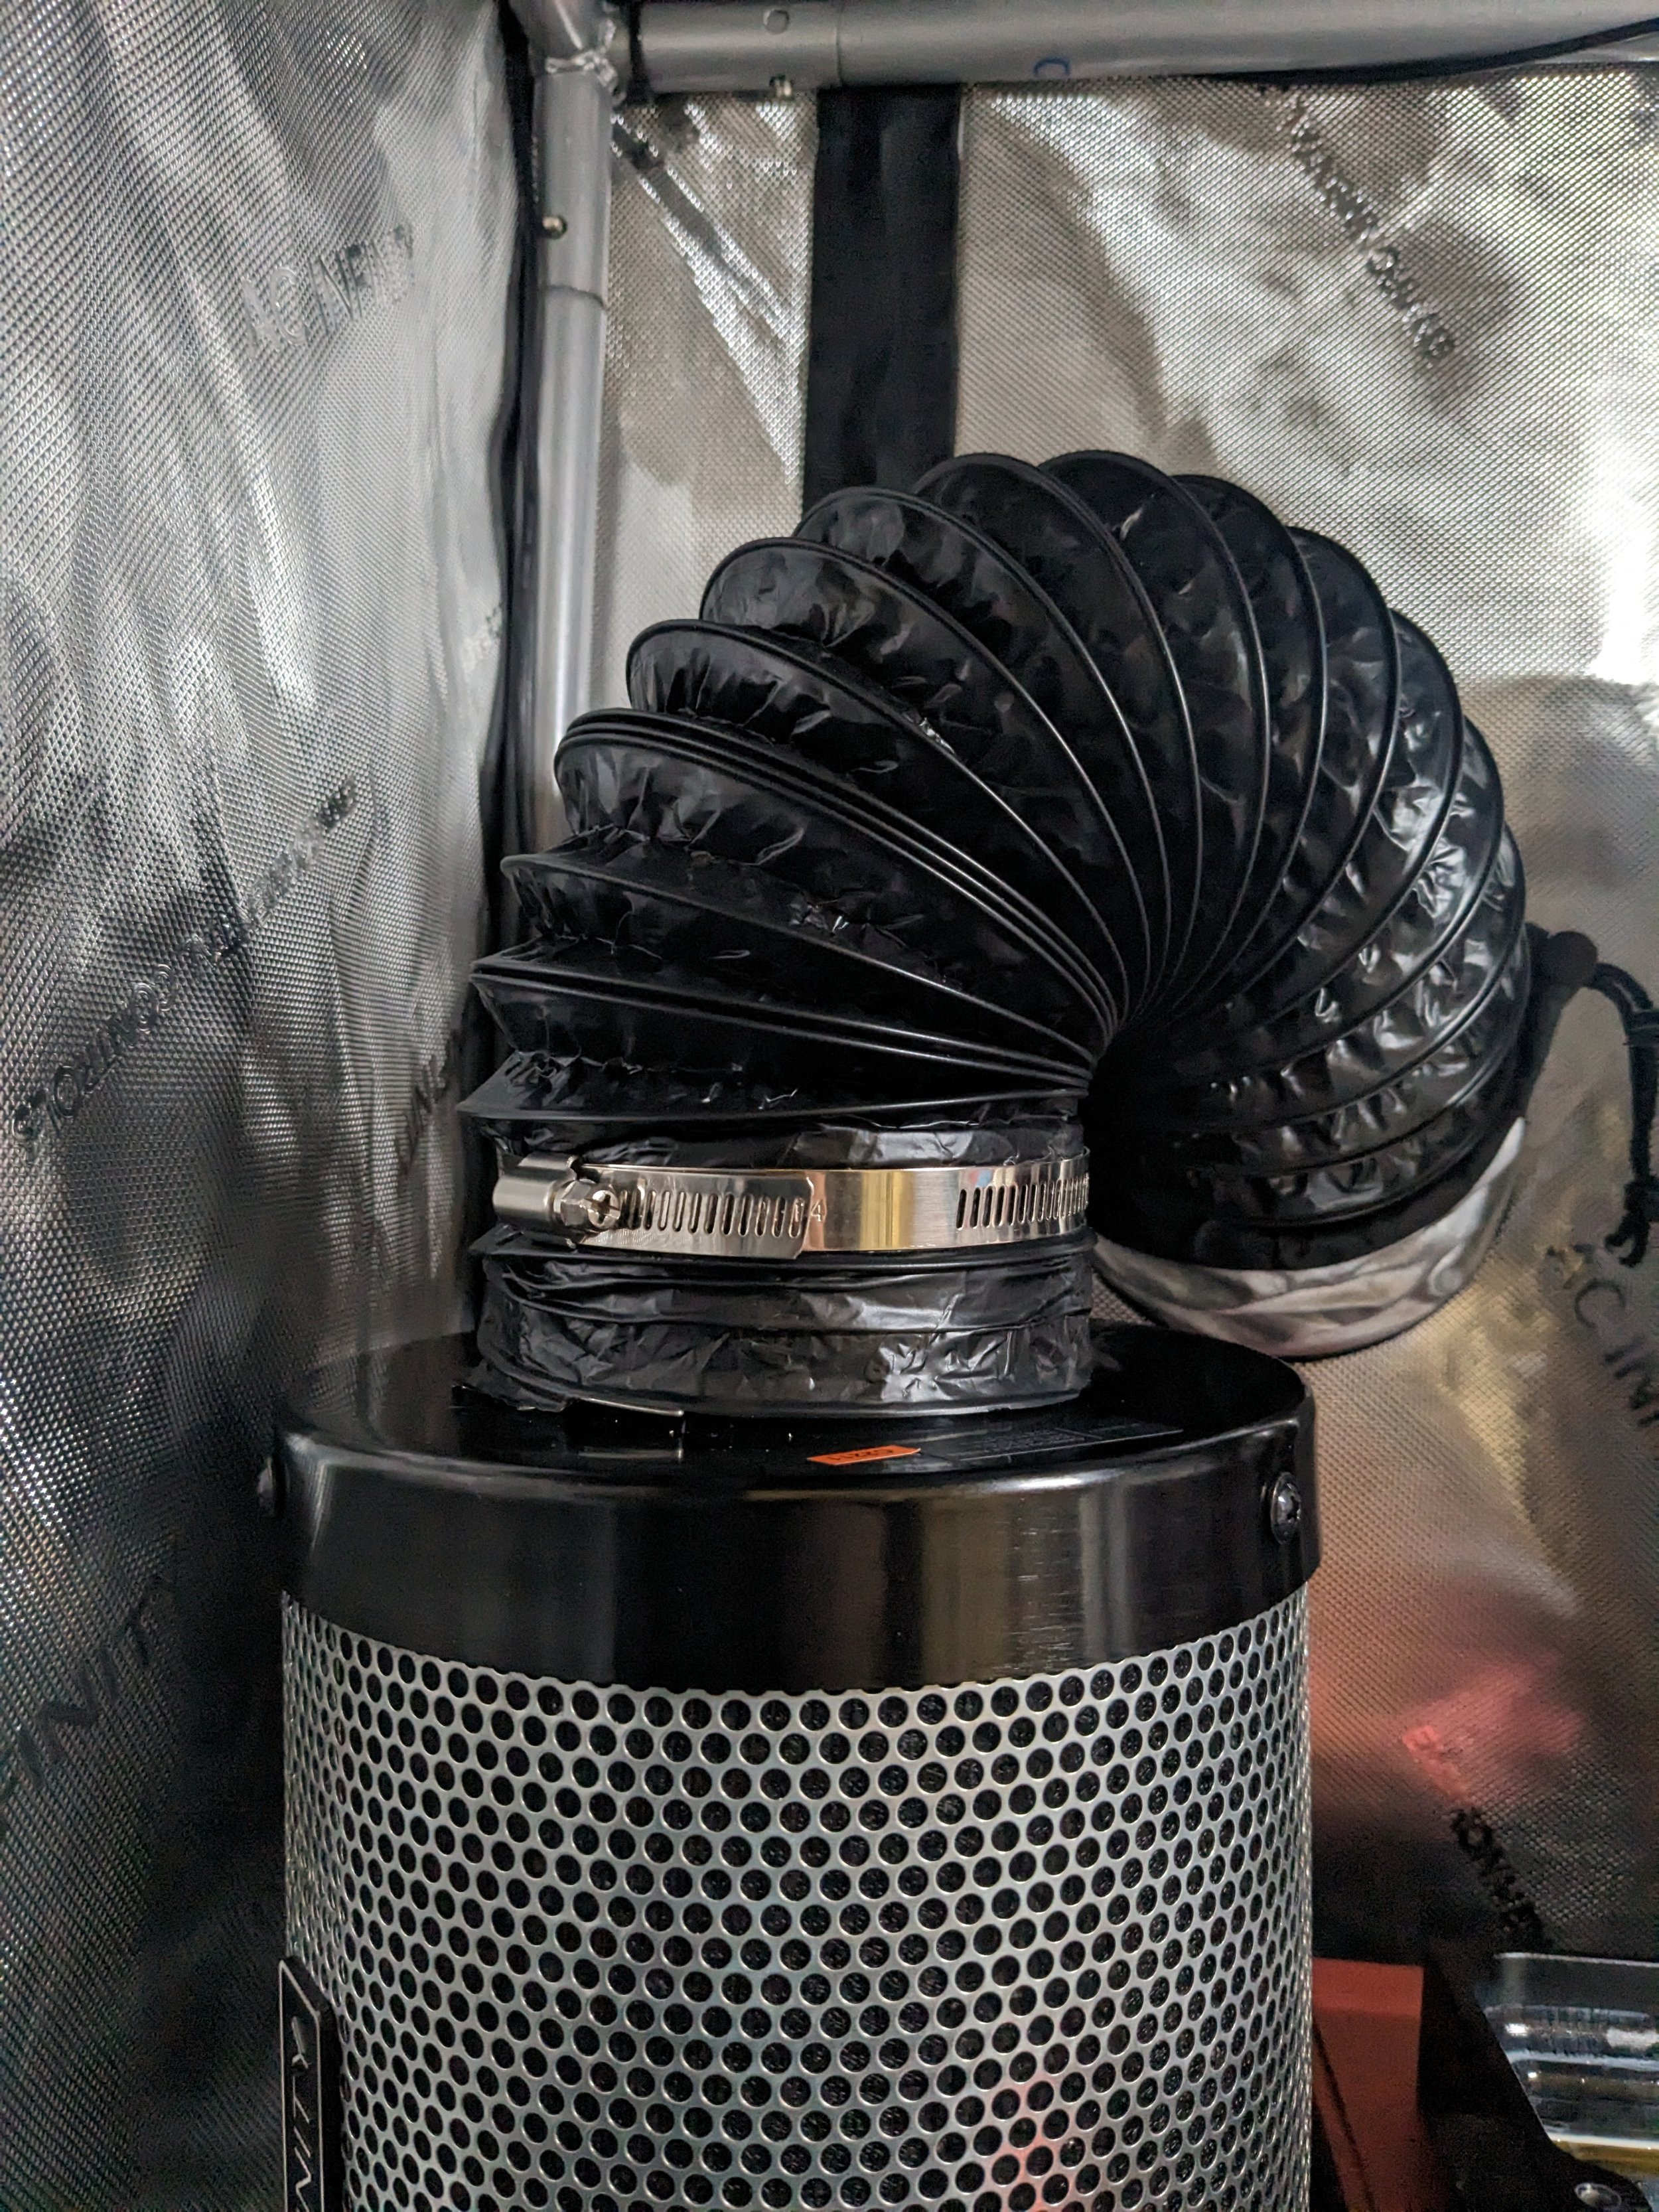
Be mindful if venting outside where other people can be exposed to the off-gassing from resin printing. I use the AC Infinity Air Carbon Filter 4". This replaceable carbon filter can absorb the resin smell before it goes outside. Be sure to grab an extra set of 4-inch hose clamps, not sure why it doesn’t come with it - a little annoying, NGL - but worth the effort for your neighbors if you have any and the environment to filter the vapors before they go leave your enclosure. 11/2024 update - In regards to the clamps - Maybe that changed since I first bought it if it has - please let me know so I can update this!
Depending on how much usage you put it through, replace it accordingly. Your Mileage May Vary. If you use this filter - you can skip the bug screen as the cartridge is sealed. (see below)
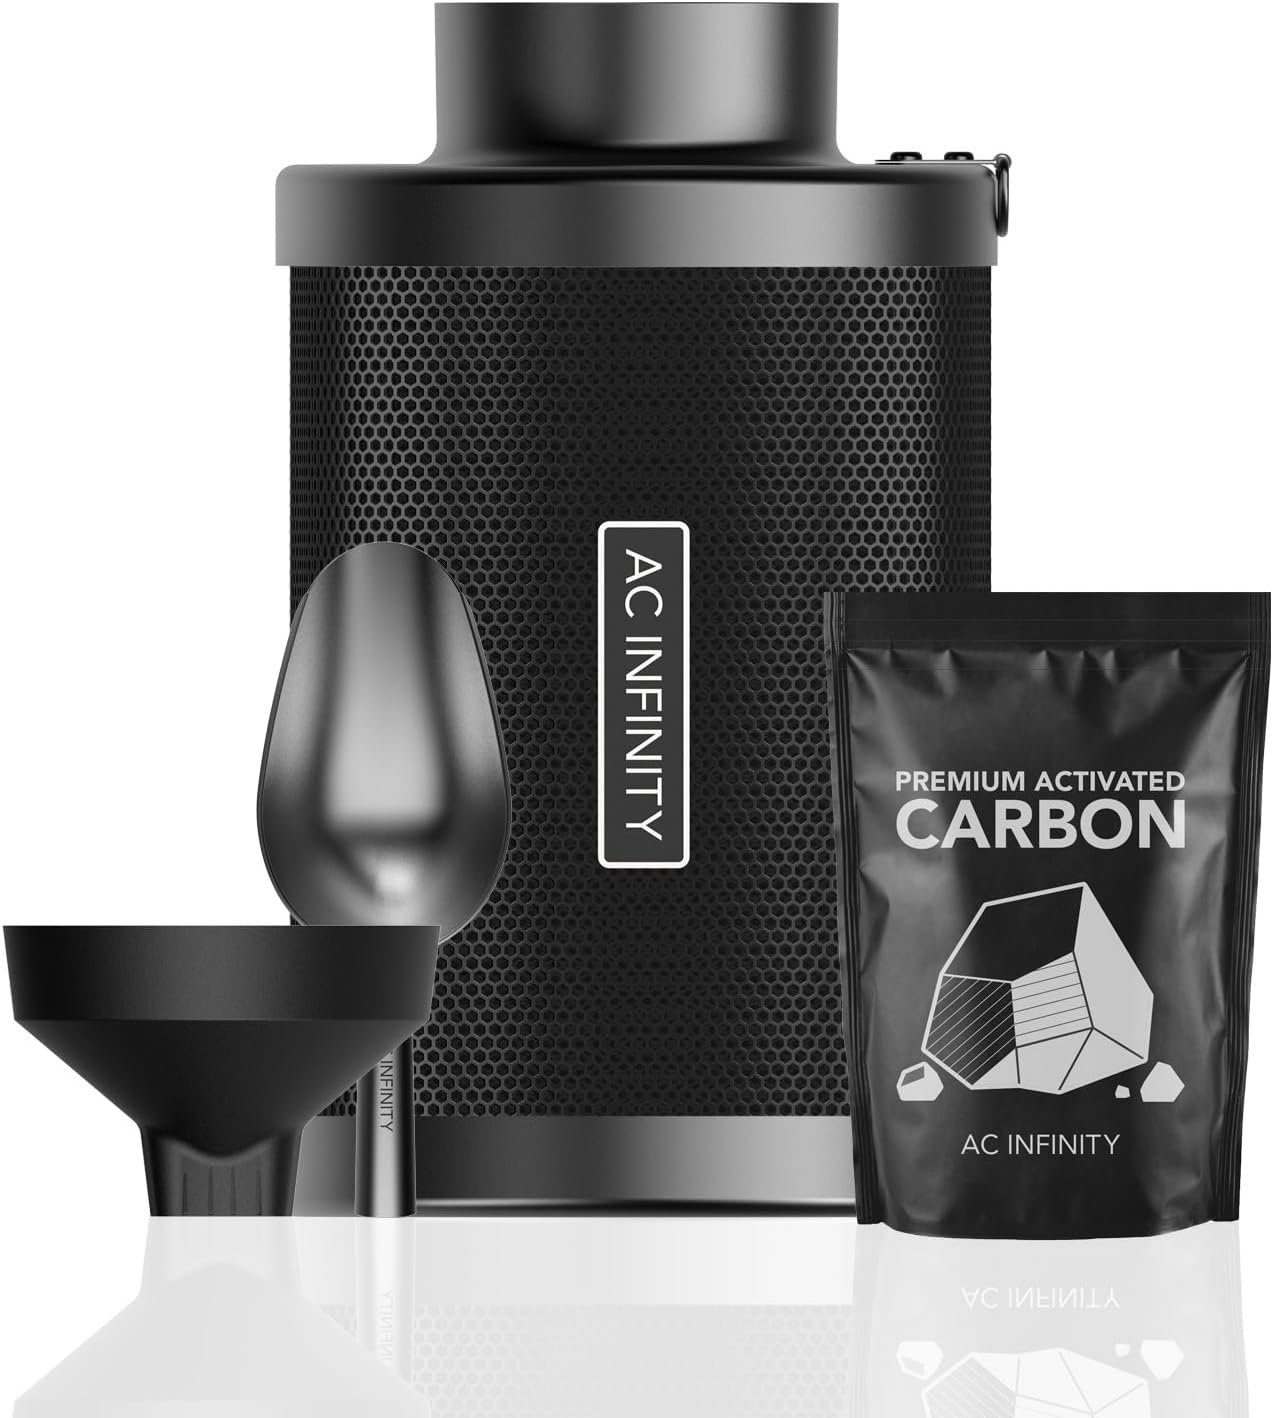
Update: 11/2023: Ac Infinity now offers a refillable carbon filter!
I’m all for reusing when I can so I will be switching over to as this means less waste. So I have since replaced the previous link with the new refillable filters if you need them as well.
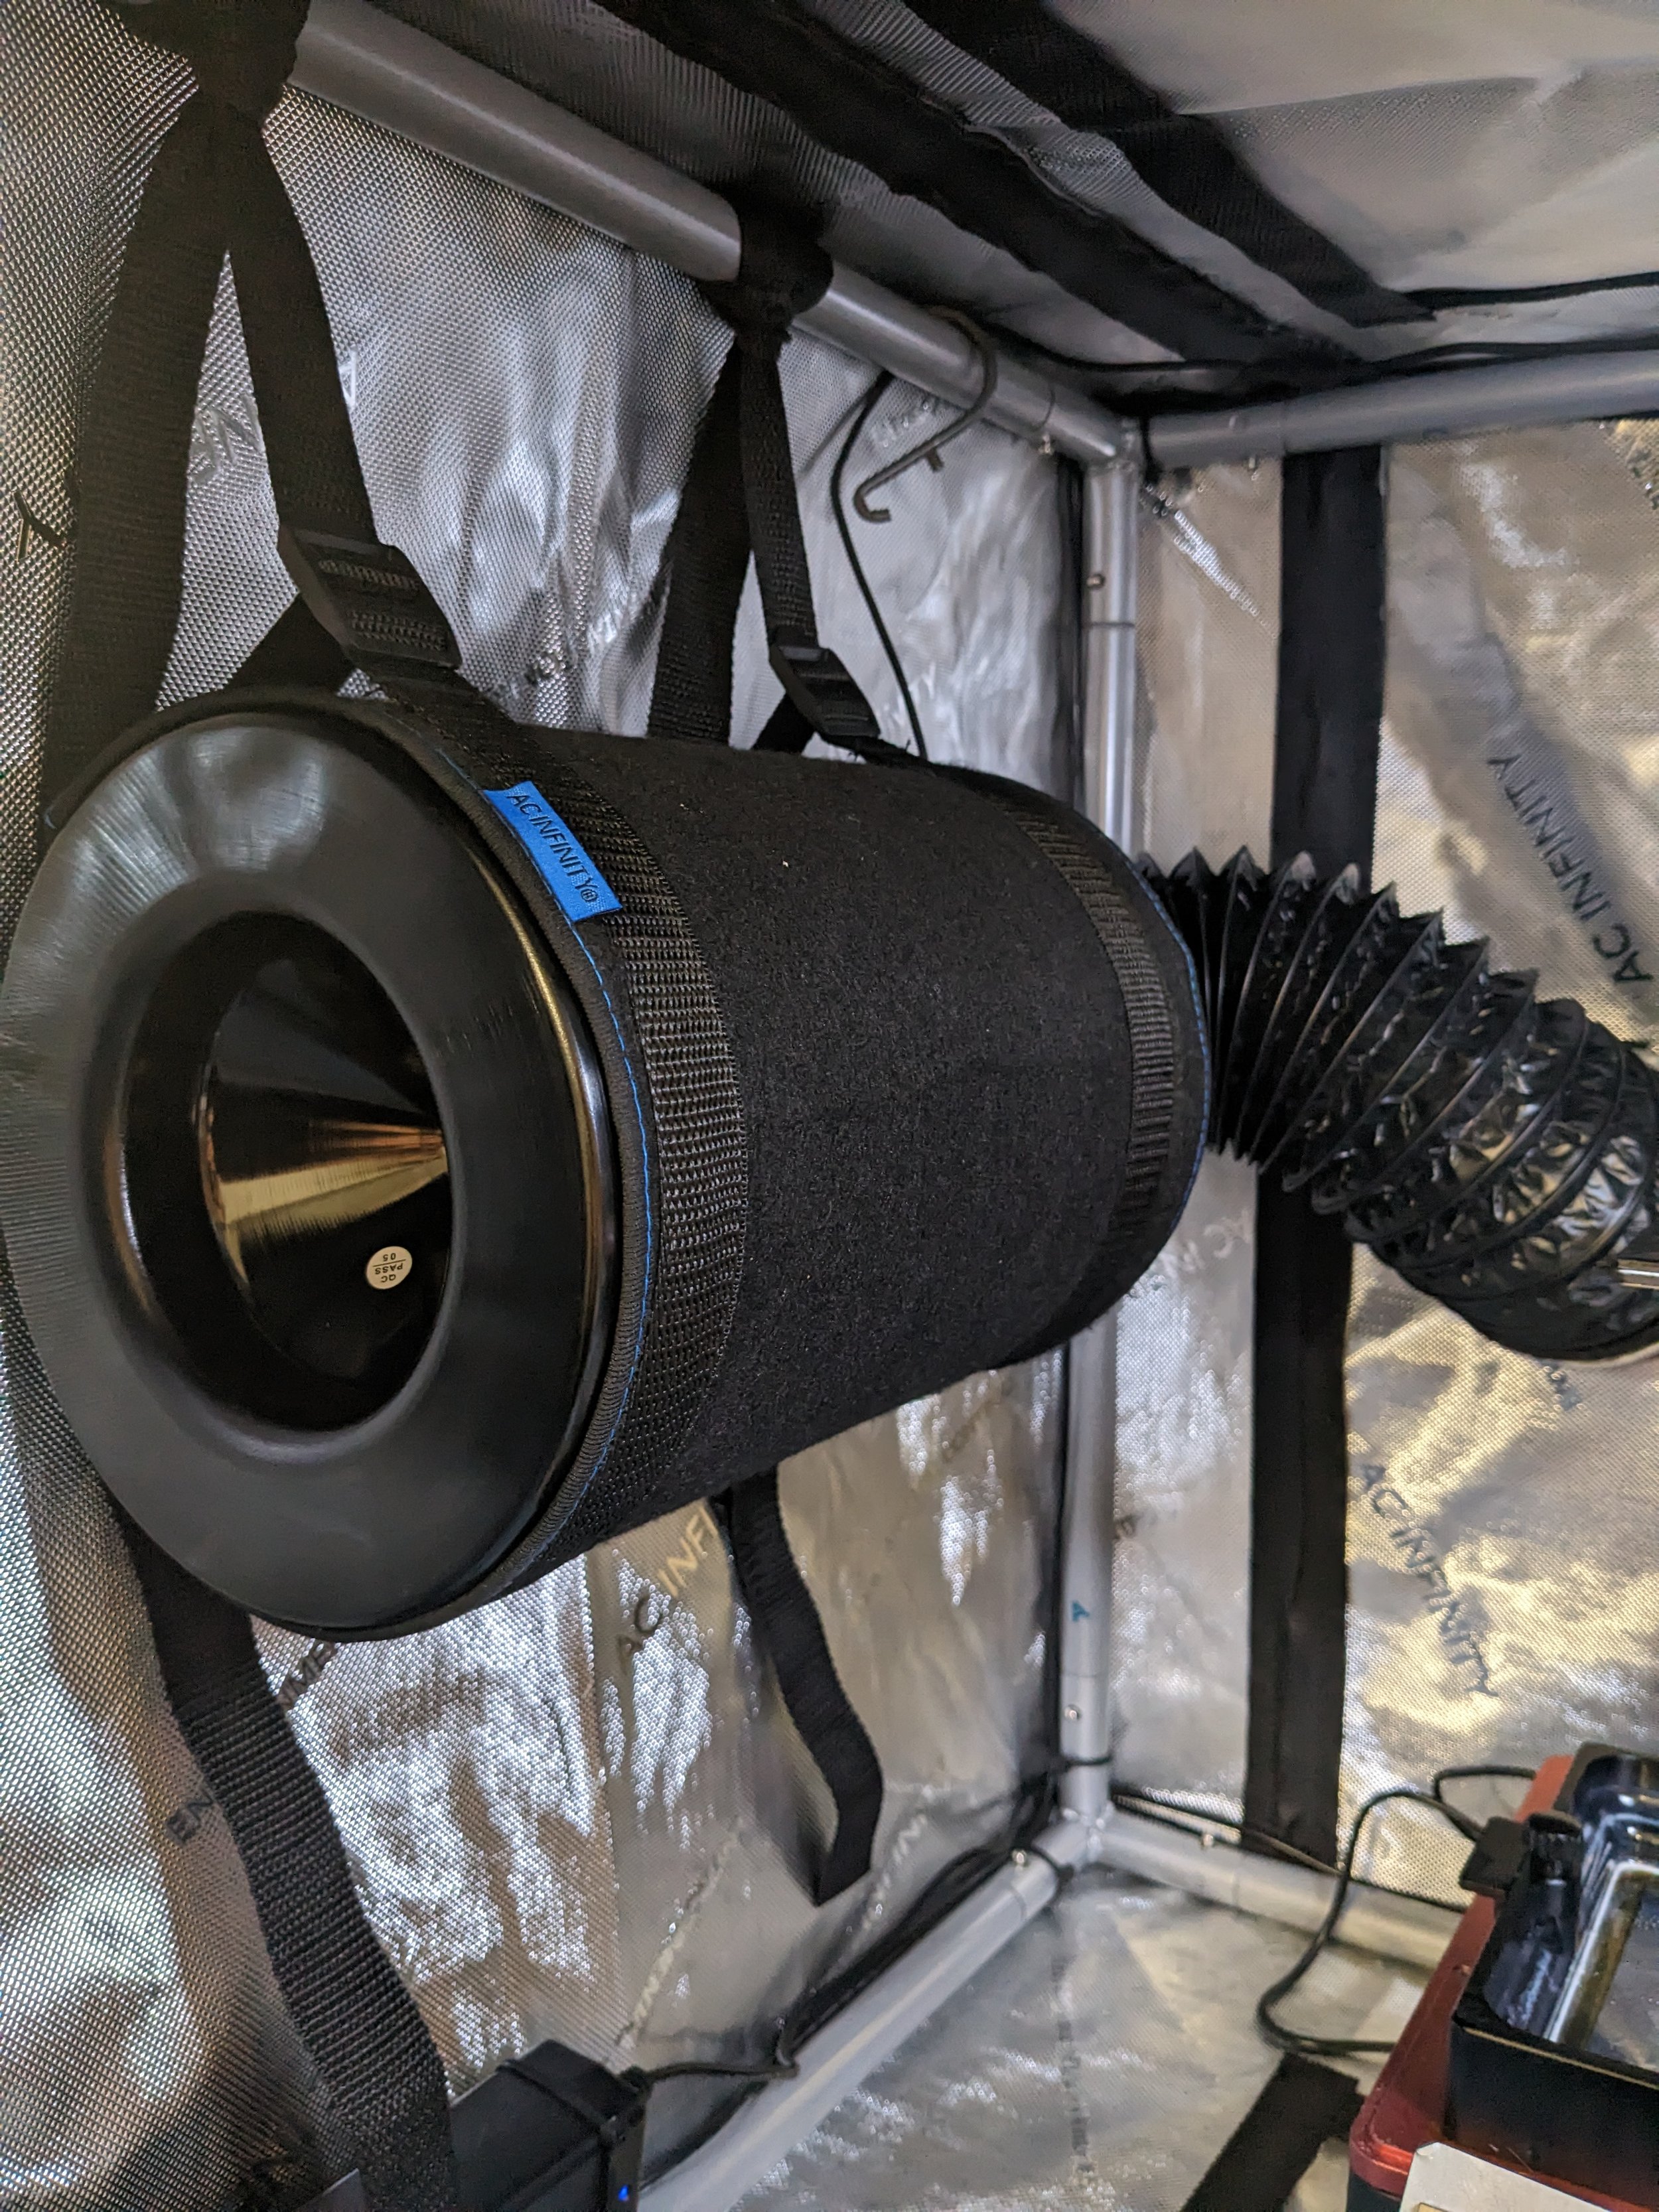
After I installed the filter, I added the pre-filter and hung it up to get off the bottom of the enclosure. It comes with 2 straps and 2 pre-filters. The filter currently hangs at the end of the enclosure. For peace of mind, I did my incense test again and it still draws the same, regardless of where the filter sits.
Lastly, If your resin printing space is set up a distance away from a window, you might want to use add the AC Infinity RAXIAL S4, Inline Booster to help push the resin vapor smell along from the inline fan further along the tubing toward your vent. Some users are running lines in their basements from the back to the front where the window is located so this is useful for that kind of thing.

Just in case, if some of you are lucky enough to live where it’s warm all year round, that also means bugs or even lizards. I recommend getting at least a bug screen mesh or the carbon filter listed above. The carbon filter is sealed and does double duty to filter the smell and keep out pests.
What about a space with no windows?

If you have no windows but have a washer and dryer hookup - Consult your HVAC professional to see if you can vent out through a Y Connector and a blast gate. (Pictured here)and have a backdraft dampener (pictured below) to keep the air moving one way and prevent blowback. This is not HVAC advice and I am not an HVAC professional.


Notes* for IPA safety
If you use your wash station inside the enclosure, be sure to keep your IPA container closed so that it doesn't concentrate inside the enclosure. Don’t just leave the IPA container open willy-nilly - because IPA evaporates. Some have expressed concerns about IPA fumes and the potential for fires with some inline fans as well as space heaters. If any of your electronics use brushed motors that create sparks this can be problematic - like if you have an old-school drill, you have probably seen this phenomenon before. Just something to take into account if you are working with your wash and cure inside the enclosure.
If you want even more peace of mind, you can opt for an explosion-proof industrial fan with a Totally Enclosed, Fan-Cooled (TEFC) electric motor. The smallest I’ve found in my research was this 10-inch unit, so you’ll need the appropriate hosing and adaptors to scale down to 4 inches to use with this grow tent enclosure setup.
TLDR Ventilation Upgrades for 3D Resin Printing
Resin vapors/smells/fumes are no bueno, and need to be vented to work safely around chemicals. I’ve made you a list of the things I use to vent my printers and work safer.
Equipment Shopping list:
Grow Tents
AC Infinity CLOUD LAB 422 Grow Tent, 24”x24”x48”
I have this one because I like the quality of the construction and materials.
You should buy whatever fits your space and budget - just make sure the vent holes are appropriate positioned for your setup.
Below are 2 different ones that would also work.Budget Friendlier version TopoLite Grow Tent, 24"x24"x48"
Smaller Version - VIVOSUN S223 2x2 Grow Tent, 24"x24"x36"
Fits Mars3 and Wash and Cure easily
Turn the grow tent sideways so you can fit more printers!
This is where you stick your printers and connect the fan ducting.
Inline FanAC Infinity CLOUDLINE T4 inline fan with Temperature Humidity Controller, and usable via Bluetooth App. As of 11/2022 only ~13 dollars more than the regular unit - makes it a good deal IMO. Recommended
AC Infinity CLOUDLINE T4 inline fan. Regular unit w/ speed controller - it also works great! There are other budget-friendly inline fans but the energy savings alone make the AC Infinity fans worth it in my opinion.
This pulls the resin vapors out from the grow tent.AC Infinity Air Carbon Filter 4"
Be mindful if you are venting outside to where other people can smell the fumes.
This is the new updated (as of 11/2023) refillable carbon filter that can absorb the smell before it goes outside.4-inch hose clamps
This is used to connect the exhaust tubing to the Air Carbon Filter.Window Parts
AC Infinity Flexible 4-Inch Aluminum Ducting 25 ft. but you could get the 8 ft one if you don't need so much.
This goes into the grow tent and fan.4" to 5" Duct Expander for Kitchen Ventilation Fans.
This goes into the window adapter.AC window adapter 5 inches. Remember to seal window edges to prevent cold drafts.
This goes into the window.Window Seal for AC Unit (This kind is for windows that open inwards)
If you have European-style windows - This goes onto your window.
Optional parts
LightLED Light Wand
Portable light for photography and videography and works well inside the enclosure.Attaches using embedded magnets and charges via USB 3.0
This is a really useful light that I use when I work inside the enclosure.Double-sided tape installation but takes some finessing to set up.
This is an economical light solution that works well too.
HeatersLasko Compact Heating Space Heater.
This is a solution for cold enclosures.This is another solution for cold resin (used for the resin vat)
Cup Warmer
Use Amber bottles for UV protection and to see how much you got in there.
This is to prewarm your cold resins. (And also coffee/tea when you’re not 3d printing)
FanAC Infinity RAXIAL S4, Inline Booster
This helps in case you need to run the ducting a longer distance.
Misc.Bug mesh screen
This helps keeps bugs out of your enclosure if it’s warm.What about a space with no windows?
You can also vent out using Y Connector and a blast gate with the inline fan listed above through a washer and dryer hookup.
This is for a dryer vent hook-up for your inline fan.
IPA safety in an enclosure?Some have expressed concerns about IPA fumes and the potential for fires with some inline fans. You can opt for an Explosion Proof industrial fan with a totally enclosed, fan-cooled (TEFC) electric motor. As well as removing any flammable materials when using a heater.

Stay Safe. Resin printing can be as messy as it is fun. And it’s really fun.
This is what I use and I hope this write-up was useful as a starting point for your own setups.
Now you can go upgrade your ventilation system and be resin vapor smell free! If you found this helpful, share it with someone that could use it. I know there are still some people printing in their bedrooms. No shame - just want everyone to stay happy and healthy.
Good ventilation is important for resin safety. Do you have the right PPE? Check out, Resin Safety 101 to learn more.
Special shout out to the community for so many people messaging me with their appreciation for the write-ups and how they helped with their own builds! I’ll be creating posts featuring what everyone else is doing - If you want to share yours - feel free to reach out @ u/nycraylin on Reddit.
Stay tuned for future updates. In the meantime, check out more blog posts below.
Until next time, Stay creating.
Ray @AsianJoyCo

The best time to start resin printing was yesterday, The next best time is today.

Cleaning used IPA
You got dirty IPA, now what? Find out how to clean it here.

You only got one body for the rest of your life. Treat yo’ self!
New to digital sculpting? Learn about a few different programs you can use!
What kind of tablet is right for you? An intro to the tools for digital sculpting and modeling…